Showing posts with label coaching. Show all posts

Showing posts with label coaching. Show all posts

How I keep student work - Digital Portfolios

So I'm back! It's been a very busy year this year with my school making some big changes but I'm here tonight to share what I've been doing in the classroom. I've been wanting a more permanent way to monitor my students progress as I work with them throughout the year, I also wanted to model a practice for my Year 9 students who each have access to an iPad.

I’ve started using  the app  “Easy Portfolio” which was developed by #pegeek MrRobbo. This app has changed the way I record student progress within my class. It did involve a little bit of setting up at the start (entering students/classes) but I’m so glad I took the time. Now I want to share with you all what I’ve been doing with it (see the comic strip below).


Firstly  I  created my  classes  as  “groups”  and  then  created  a  “portfolio”  for  each student  within each group/class. Now when I tap on a student’s name I’m presented with a portfolio that is broken up into file types (Video, Images, Audios, Notes, URLS, Docs). So when my year 9 or 10 classes submit work I ask them  to send  their  files as a PDF document  (Pages, Keynote etc will offer this option) and I save their attached  work  into  their assigned portfolio. This has been  fantastic as  I can monitor student progress whenever  I want  to. I can have students submit what they have done in the day’s lesson every time we meet or I can simply ask them to submit assessment tasks for me to save as a record.


When I mark a rubric  I save a copy of the rubric to their portfolio as well. As for my classes that don’t have iPads I just simply take photos of everything. I recently had year 7’s complete an assignment on Melanomas they all handed in their proudly constructed assignments and  I photographed  the work and then photographed the  hard  copy of the rubric I marked prior  to handing back to students. This ends up being a great resource when parent/teacher interviews come around.


Some of the uses of the Easy Portfolio App


What I really love though is that I can film my students performing skills in a variety of skill development lessons which I can then use to review one-on-one with the student. Video analysis is a powerful tool when used right and can correct technique issues faster than any verbal or demonstration style  instruction given by a coach. The goal for me is to film regularly enough to then hopefully capture skill improvement during a unit of work. I can then keep  this database of videos for reporting as well as parent/teacher interviews. The app also allows me to email any items in the portfolio to the student, parents or homeroom teacher. I can also back up my files using my Dropbox account.

So that's what I've been up to recently, tell me how you keep track of your students, do you have a great suggestion for us fellow #pegeeks? How important is it to track student progress in a Phys Ed class? What do you like to have on your table when meeting parents at interview time?

Stay tuned, my reporting period is nearly over and I aim to update this blog again soon!

Future focused fueled by feedback

Wow, okay! I went to another PD today with two colleagues (I know right two weeks in a row go me!). We went to see a multi campus school present to Professor John Hattie regarding the changes they’ve made within their school after developing a series of “Action Research Projects”. This school has been working closely with John and we were very curious to see what has been transpiring there.
I have to admit I’ve come away with my head loaded with ideas and thoughts on better practice regarding whole school approaches to change and if you get the chance to hear or read John Hattie’s work I recommend. All I’m going to do with this blog post is summarise the key themes that kept popping up during today’s PD.

Future Focus
The day was very future focused, each group that presented (there were 7 all up) asked “where to from here?” They reflected on their practice and avoided descending into the hang ups of what didn’t work, instead focusing on what worked and what could be improved. It was generally accepted that engagement and activity was a precursor for learning, yes it was needed but teachers were encouraged to ensure that learning occurred after “hooking the students in”. This train of thought is crucial when considering the use of technology in the classroom. Yeah iPads and smart phones are great ways of getting students engaged in the process but if those tools are not being used to gather further understanding of content being studied then it’s up to both teachers and students to determine their usefulness.

Feedback
The majority of the day was aimed at feedback. Whether it is gathering feedback from students regarding their understanding of a topic or gathering feedback of how the teacher was going in terms of delivering content. Feedback is important when done right because it lets the teacher know what needs to be done to assist those who need assistance, and also to know when things are done right. Most groups discovered however that questions need to be well planned in order to get quality feedback, and in most cases students needed to be explained the difference of providing constructive feedback as opposed to “good work Miss!”

What is Progress?
Another crucial point that was mentioned during the day was that all teachers needed to have a common perception of what constituted as “progress”. Often teachers have a vastly different view of what is progress and they share this view with their students either explicitly or subconsciously. When different teachers in the same school present different understandings of progress to their students it becomes a confusing affair not only for the students, but also their parents and other teachers within the school. The way this school was attempting to tackle the mammoth task of understanding progress and having students aware of their progress was through the use of visual spaces. They placed the VELS progression points around the classroom and students used avatars of themselves and stuck them to the progression point that they were currently at. Students then used “I Can...” statements to assist them in planning how to move to the next progression point. This process meant that students were aware of their progress as they moved through their course work as opposed to just being handed an end result as if it’s a signal that the learning has ended.


Senior teacher only?
An interesting point that came up was schools that place certain teachers in senior classes only, and continue to do so year after year. These senior teachers are also often not exposed to junior or middle year classes and therefore the earlier development of their potential future students. This has always struck me as odd. Why leave your best players out of the game until the last quarter? Why not give our senior teachers a chance to better prepare their students well in advance before they even step into their senior classes? Keeping key teachers in senior year levels can sometimes send the message to students that some teachers are more “expert” than others and sometimes this could be far from the truth.

All in or nothing at all...
It became abundantly clear that if you want to take on a whole school project that will eventually change the way things happen in your school then you really do need everyone on board. If not students fast recognise which teachers are moving with the change and which ones aren’t. We as teachers also need to recognise that as a professional in a profession we should be staying well read on best practices and implementing what we can to show that we are well equip to develop the young minds of tomorrow. In this day and age it is no longer acceptable to state that technology (in particular iPads/tablets/smartphones) has no place in a learning environment when it is clear that these tools are being used in the business world that we plan on sending our students into.


I’m going to close this long blog post with some key reflective questions that popped up during the course of the day that I found particularly powerful or interesting:

Who is asking the questions in your classroom? Is it you (the “expert”) or is it the students (The “learners”)?

What is success? What does it look like? Do we demonstrate to our students what success is?

How often do you receive feedback from your students regarding your practice? How comfortable are you about receiving feedback from your students?

Are you aware of your impact on students? As a result do you challenge them? Do you challenge yourself?


Top 5 PE Apps worth your time

There are so many blog posts floating around the blogosphere recommending this app or that app that often it's hard to determine which apps are worthwhile getting, and which apps are just being promoted by the app creators. The other killer is that there are so many apps that are similar to one another that it makes it even harder to get something worthwhile at all.
As teachers, we're far too busy to sit down and try out app after app until we find one that does the job... we also don't have the time to learn how to use the app... only to then teach students how to use the app too. So to help ease the world of apps a little allow me to share with you the top 5 PE apps I have used in class and therefore know work well!

1. iMuscle ($4.99)


This is a killer app! Forget your Anatomy textbook... this app smashes it out of the ballpark! It can be used as a standard "okay let's look at the muscles in the leg" tap on and read the label/name of the muscle... or it can be used as a powerful resource that demonstrates complete with moving clips how to exercise each muscle. So whether you want to use it to explain muscle movements (flexion/extension) or you want to show your star athlete's why they are doing the exercise that you just prescribed to them... you just know visually this app just makes sense. Professionals in the medical fields are loving this alternative way to demonstrate things to their clients too by the way.

The App in Action

2. TimeMotion (Free)


This little app is simplistic in design and functionality. The app is used simply to record how long a player spends doing the following: Running, jogging, sprinting, walking, standing etc. Have students monitor someone in their class as they participate in a game. All they need to do is tap whatever is occurring as it occurs. When the game ends they hit "Stop" and ta-da! an instant break down of how long their player spent doing each movement type. They can record the data and discussion can then take place on the value of knowing how hard players work in a team environment.

The app in Action


3. Nike Training Club (Free)

Want to punish your students? Want to make them work out but allow them to select their own say 15 minute work out? Then this app is fantastic! But be warned for those who aren't involved in regular moderate to vigorous exercise the workout can prove to be brutal. The great thing about this app is the majority of exercises to be completed in any workout require minimal to no equipment. You can preview the list of exercises in the list prior to engaging in it to allow injuries or weak spots to be protected or targeted. You can select how long the workout will go for and the best thing is each exercise comes with an instructional video demonstrating the exercise. Students love the freedom of selecting what they want to work on, they can even play music with the app to keep them motivated as it counts down the time left.
Apps like this one are great discussion tools too in regards to whether they really are beneficial for people wanting to build on fitness, the risk of uninformed people using the wrong apps in the pursuit of weight loss and dealing with body/self-esteem issues is a worthwhile conversation to have.

The App in Action


4. AIDSinfo (Free)

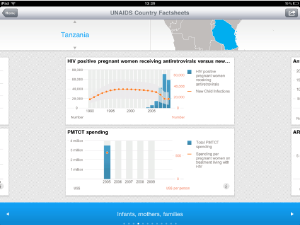
This app is brilliant when it comes to looking at health related issues on a global scale. Information is updated and relates of course to the AIDS epidemic including life expectancy, risk of infection rate even education regarding AIDS. Just tap on the country of interest to find the facts and figures. Have students compare countries/continents. Great way to create discussion and debates can result with great use of factual information.


The App in Action

5. Tap Roulette (Free)

This is the best app I have in my bag of tricks and it's best when it comes to picking who gets to go first, who starts with the ball, who gets to be captain, who gets to start on the bench and so on. This app beats flipping a coin because it allows for you to incorporate more than 2 teams in the picking. I often have my class split into three teams with one team resting on the bench/umpiring/scoring whilst the other two teams play (great strategy when you have too many players for games like basketball, netball, handball and indoor soccer). All teams select a captain who then meets me with my iPad on the court. I ask all three captains to place one finger on the black section of the screen and I hit "Pick Finger" The app then randomly picks one of the fingers to highlight. The captain belonging to that finger can then inform their team they're on the bench first.

The App in Action

So there you have it! These are by far my favourite apps at the moment as they're easy to use and act as the perfect tools without becoming cumbersome... and the best thing... you don't need to "learn how to use the app".

Keep checking back, subscribe and tell your PE friends I'm planning to keep the ball rolling on this bad boy of a blog!

It's as easy as a click and a snap!

So you're planning your lessons for the future and you know you want to use technology in your class room because it's the new thing that everyone is doing... the problem is your school doesn't have iPads or laptop/notebooks for every students. Never fear! All you need are cameras!


In this day and age most students (Study) have a smart phone of some capacity with most carrying the ability to take photos. This provides the way in where school budgets perhaps can't. Photo taking abilities in the classroom can enhance and alter the way an activity is conducted, however there needs to be a common understanding of why the camera/phones are being used, and also what is considered an appropriate use of these tools.
The variety of smart phones available is astounding...


Taking the time with your students to discuss and develop a set of agreed upon terms regarding the potential use of camera/phones within certain lessons is well worth the time. When all students feel that they have had a say in what will be the governing rules over a tool that they will be allowed to bring into the classroom they certainly feel the experience is more authentic overall. Never assume that they will know instantly what is appropriate and what is not when it comes to the taking of photos and the use of phones within the classroom.

Good questions to ask when developing guidelines for phone/cameras include:
- Should permission be sought prior to taking a photo of someone? Why/Why not?
- What should be done with photos once they are taken?
- How can we use these to our advantage in class?

So now you've all agreed on rules regarding the use of cameras within the classroom... where to from here?

How about the following ideas:
 - Photo clue orienteering
 - Trio Film Coaches


What is.... Photo Clue Orienteering/Scavenger Hunting...

The school ground becomes the hunting grounds as you provide your students with cryptic clues for them to solve. This can be done a variety of ways with the aim of the challenge for students to make their way from one place to another via the clues provided.

I always start with this activity when looking at an orienteering unit. It's a great lead in activity and by the end you can have students discussing the difference between orienteering, rogaining and scavenger hunting. The only down side to this activity is the prep work you as the teacher needs to do prior to the unit, however set it up properly the first time and you can have a handy activity to repeat year after year.

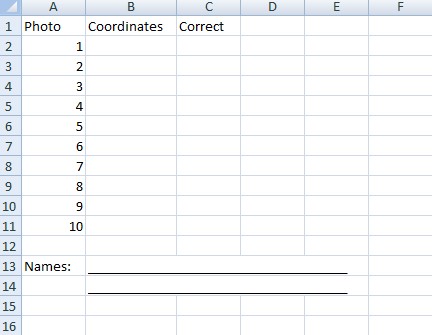
Prep work: Prior to teaching the unit you will need to photograph your cryptic photo clues. I went around the school and took about 20-30 random photos of odd little things that exist in the school. I took photos of the tops of poles, edges of buildings or signs, parts of fencing, taps and drains. The aim of the photos taken is that they are hard to determine what they are at first glance. I then printed and laminated 5 copies of each photo with a number assigned to the back of each. I also created a tabled sheet that had as many rows as there are photos and three columns for students to track their progress. The last thing I created was an aerial map view of the school via Google Maps. I put a simple grid over the map image and created coordinates for the map. I then printed and laminated around 8 of these.
Example of map

Example of results form given to students


Activity in action: After introducing what the aim of scavenger hunting is I asked the students to get into teams of no more than 4.
Each team needs to ensure they have:
- someone with the ability to take photos
- someone to record coordinates of located photo clues
- someone to carry and read the map
- someone to hold onto the cryptic clues that they are given by the teacher.

I then hand each team 2 of the many different photo clues and send them out with the following challenge "Step 1: Get a photo that shows the cryptic clue and it's surroundings and include your team in the photo.
Step2: Try to determine which square on your map grid the location of your clue is at and record it on your sheet."
Cryptic Clue example
Example of photo to be taken including team,cryptic clue and it's surroundings


What happens next is students take off running to where they think they remember seeing something in the school that resembles the cryptic clue. The photograph becomes evidence to show they made it to each destination. If a cryptic clue card proves to be too hard they can trade it in for a different card at any time. The beauty of having them return to base after finding each 2 clues means you can control how long they have until times up. An alternative option is to print the clues onto a sheet and number the photos on the sheet and provide each team with all the clues and an end time when they need to return to base (the classroom).

The next step after they've had a blast running around doing this activity is to have them create their own set of cryptic clues to challenge another team with. I've even had students use photo editing apps on their phones to change the colours of their clues or alter them slightly for added difficulty.


What is.... Trio Film Coaches...

Trio Film Coaches is a great way to use photo/video analysis during skill development when doing any sport unit.

Simply have students break into threes and provide them with a series of skills to practice. They are to take it in turns to practice a skill whilst one of the three films the skill. Threes work best as one can film whilst the other two act on the skill, this is particularly handy for most team related sports. The trick to getting this working well is to set a routine that stays the same regardless of the sport unit being looked at. Prep work is minimal but the benefits of the activity are immense.

Prep work: Be prepared to model this first so that students are aware of the aim and potential outcomes of doing such an activity. If you have time, film yourself twice performing a skill prior to the lesson. Have one film of you performing a skill incorrectly and one film of you performing a skill correctly and show it to the class then open up discussion "which was the correct way to perform that skill? Why do you say this? What benefit can we get from watching ourselves perform a skill?"
Inform students that they will be working together in threes to film themselves performing different skills throughout the year to reflect on their skill development. Be sure to develop a routine when it comes to film sessions so that you only need to announce to students to get into their trios and they'll then know to repeat what they have done previously.
For analysis you can create either a peer assessment form for the two coaches of the third person to fill out regarding the person they filmed OR alternatively a self evaluation form where students use the video and any advice from their peers to analyse their performance of the skill and highlight where things went right and what needs to be improved.

Activity in action: Introduce the skills you wish to be the focus of the session (Softball pitch). Demonstrate the skill correctly and highlight the main teaching points of the skill as per usual. Have students practice the skill as you normally would. Before moving onto the next skill that you would teach during the unit stop and announce that the drill they just practised is this unit's "skill to film" and ask them to get into their trios.
Students then have the opportunity to film each other performing the skill they just practised and then time after the filming is set aside to analyse and evaluate.


The next step of course is to get your hands on some great video analysing apps that allow you to draw on the video to get angles of release, lines and angles of limb positions, weight and balance movement etc I personally use Excelade and Swing Plane HD on the iPad. Coaches Eye is another ripper too.


There are of course hundreds of different ways to use cameras or smart phones within the classroom to enhance the learning experience. In future blog posts I'll be sure to explain Google Goggles, QR Codes and other handy apps so be sure to stay tuned.
If you like what you've read, share it around with others. If you have a question be sure to ask in the comments section. If you've got a suggestion for a lesson idea let us know that too! Until next time peace out!